Over 1500 quality clay and ceramic products for hobbyists,
teachers, and potters.
FAQ
Dawson Kiln Sitters and Parts
For the ultimate in safety
and reliability, these models add a shut-off timer to the basic
KilnSitter®.
If for any reason the
cone-actuated tripper mechanism is unable to operate properly,
the timer guarantees that the kiln will be shut off after the
expected firing period has elapsed. This protects the kiln and
the ware from being over-fired when the unexpected happens ...
shifting kiln shelves or objects coming into contact with the
sensing mechanism ... defective or improperly mounted cones ...
and so on.
The adjustable 20-hour
timer uses a precision synchronous motor and is purely electromechanical,
using the same electric power as the kiln's heaters. The accuracy
of the timing period is therefore assured, and the timer is sure
to be active whenever the heaters energized.
DAWPT-LT3K (Flush Mounting)
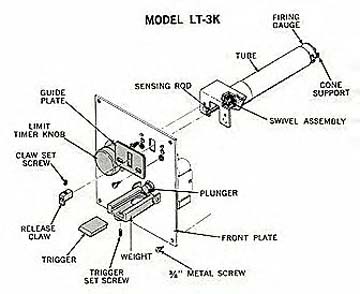

Dawpt-LT3K(above)
Dawpt-LT3 (above)
Tube Assemblies
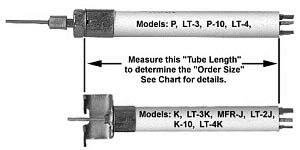 When ordering tube assemblies
for your kiln sitter, You will need the kiln wall thickness and
kiln sitter model.
When ordering tube assemblies
for your kiln sitter, You will need the kiln wall thickness and
kiln sitter model.
Frequently Asked Questions (Information
provided by W.P. Dawson, Inc.)
1. My kiln consistently under-fires (or over-fires)
when I use the KilnSitter®.
The KilnSitter® is designed to trip at the point
where the cone or bar has bent to an approximate 90-degree angle.
This trip point is established by proper adjustment of the trigger
and claw assembly. Refer to your operator's manual to check this
adjustment, and readjust your KilnSitter® if necessary.
2. My firing results are erratic. Some firings are
okay, but others are over-fired.
Problems of this type can usually traced to a corroded
swivel on the tube assembly. To check this, remove the guide plate
and look at the area of the tube assembly where the rod comes
through the tube. If any corrosion can be seen on the outside
area around the swivel, replace the tube assembly. Whenever replacing
the tube assembly, be sure to readjust your KilnSitter® according
to the instructions provided in your operator's manual.
This problem usually results from inadequate venting
of the kiln or from firing materials that generate atmosphere's
that are unusually corrosive. Reconsider your venting strategy,
taking into account the size of the kiln and the type of loads
being fired. For normal firings in smaller kilns, leaving the
top peephole open is usually adequate. For large kilns, or loads
likely to produce strong fumes, also open the bottom peephole.
For maximum venting, leave all the peepholes open until the reddish-yellow
heat state (about 1100°F/600°C), then insert the plugs.
This venting schedule is also suggested for firings requiring
that you completely close the kiln.
3. I can't engage the plunger button on my KilnSitter®.
For Models LT-3 and LT-3K, the plunger button will
not engage when the timer knob is resting in the "OFF"
position. Turn the knob to a higher setting, then try again.
In other cases, foreign material or corrosion sometimes
prevents the cam or lock assembly from moving to engage the slot
in the plunger button. For "LT" models, move the timer
knob beyond the 20-hour mark while at the same time pressing the
plunger button. This will ordinarily force the cam into the slot
of the button. Then manually release the weight to make sure the
cam properly disengages the button. If this procedure isn't effective,
or the KilnSitter® is a Model "P" or "K"
(no timer), remove the face plate and clean or replace the cam
or lock assembly. Be sure there is no corrosion or other contamination
of the surfaces, and also check that the faceplate is not bent.
If there is any question about the condition of these parts, it's
good practice to simply replace them.
4. How often should I lubricate my KilnSitter®,
and what lubricant should be used?
NEVER! The KilnSitter® requires no lubrication.
The introduction of oily or greasy substances can impair it's
normal operation, resulting in over-firings.
5. The plunger button on my KilnSitter® appears
to have become deformed.
Too much heat on the back side of the switch will cause
the plastic plunger button to deform, ordinarily causing the KilnSitter®
to shut off. This prevents damage to the connections on the back
side of the switch.
Inspect the back of the switch to determine the cause.
Loose connections on high-current circuits generate excessive
amounts of heat through arcing. Dirty or corroded connections,
or undersized wiring, also become increasingly resistive to current
flow, producing unusual amounts of heat because of excessive power
dissipation in the wiring or at the connections. If not unattended
to, problems of this kind usually damage the wiring and eventually
the terminal area. Be sure these connections are clean (bright)
and tight. Remove damaged sections of wiring and replace any terminals
that appear to have been overheated. When stripping insulation
from the wires, be careful not to cut through or score any of
the outer strands. Also inspect the switch assembly for overheating
of the center post spring or discoloration of the ceramic block.
If the switch assembly has been damaged, be sure to replace it.
Periodically inspecting high-current electrical circuits
for loose connections and signs of overheating is good maintenance
practice, often preventing down-time and saving expensive repair
bills.
6. The plunger button engages, but the kiln won't
come on.
Obviously, the first step is to assure that there is
power to the kiln and that its switches are turned on. Following
that, visually inspect the switch assembly to determine whether
the contacts are actually closing, and if not, why not. In extreme
cases, heavily damaged contacts may prevent electricity from reaching
the kiln. See the above item for more information.
7. My KilnSitter® contacts are stuck.
Heavily damaged contacts may arc badly enough to weld
closed. If the contacts appear to have been damaged or overheated,
replace the switch assembly. In some cases electrical surges can
cause transient voltages on the power wiring that produce arcing
hot enough to weld the contacts. In this case there would ordinarily
be no other signs of damage or wear. Pop the contacts open manually,
then reassemble and test the unit by turning the kiln's switches
full on and manually toggling the switch, observing that the contacts
break properly each time.
8. The cone in my KilnSitter® sometimes doesn't
deform properly or breaks.
Cones must be able to slip in the cone supports for
proper operation of the KilnSitter®. If the cone supports
are corroded or heavily coated with kiln wash, the cone may stick.
In this case it may stretch, rather than bend, and may break.
Clean excess kiln wash and any other foreign material off the
cone supports. If they are heavily corroded, they should be replaced.
9. Why does the cone fall out of the KilnSitter®
during some firings.
As noted above, the cone must be able to slip in the
cone supports for proper operation of the KilnSitter®. Shock
or vibration may therefore dislodge the cone from the cone supports.
This is a problem that must be fixed at its source. Other than
assuring that the kiln is reasonably level, nothing can be done
to make the KilnSitter® less susceptible to high levels of
vibration, bumping, etc.
10. The KilnSitter's tube is chipped at the cone
support slots. Can that be repaired?
No, the tube must be replaced.
11. The KilnSitter's tube appears to be loose. Will
that affect my results?
Yes. If possible, tighten the mounting nut. Otherwise
the tube should be replaced. On Models K and LT-3K, tighten (or
replace, if necessary) the flat-head screws that secure the tube
mounting bracket to the front panel.
12. My KilnSitter's sensing rod has changed shape.
Over time, the sensing rod will begin to taper and
wear with use, depending on the type of firing you do. When this
becomes noticeable visually, it's time to replace the rod. Bent
rods must also be replaced. When replacing rods, be sure to inspect
the swivel area for corrosion. If corrosion is present, replace
the entire tube assembly.
13. The timer on my KilnSitter® is not working.
The timer is an electrical device, and will not operate
until the KilnSitter® contacts are closed. Inspect the wiring
from the back of the timer motor to the switch contacts, and repair
it if necessary. Otherwise replace the motor.
To test the timer, turn the kiln's heat switches off,
then engage the plunger button and set the timer for 1/2-hour.
14. The timer works, but is sometimes inaccurate.
The timer motor uses the power line frequency as its
timing reference, and is therefore inherently very accurate. However,
it also contains a gear box with a slip-clutch that permits setting
the timing period, and these mechanical parts are susceptible
to wear and damage. If the knob is indeed not properly tracking
the elapsed time, a loose connection to the motor might be indicated.
Otherwise, the motor might have been damaged and should be replaced.
External turn-up controls, if wired into the electrical
line ahead of the KilnSitter® will cyclically interrupt power
to the KilnSitter® (and its timing motor) during the turn-up
sequence. In this case, the motor will actually be off half the
time during the turn-up sequence, and the error will be equal
to about 1/2 the turn up time.
 Copyright 2003 Fort Pottery Company. All rights reserved.


